Foreward
This is the part of the recipe most people skip. I, of course, urge you to read it. However, if you want to begin creating an IRC server immediately, skip to Part 2.
Discord, as part of the ongoing global elimination of personal privacy, online anonymity, and the tightening of advertising heuristics, is implementing invasive and violating data collection practices that will expose its users to a tremendous amount of risk and isolate already marginalized individuals.
Following this guide will leave you with a method of chatting with people who are important to you, that is one step removed from the whims of tech companies whose interests are informed by puritanical profit motives.
However this is a band-aid, not a solution. This isn't truly "self-hosted". The bare metal running the IRC server isn't in your hands, running on your home network. And even if it was, that server would still be subject to the restrictions of your Internet Service Provider (ISP). Discord implementing required ID verification is just the first step. Unless mass organizing, protest, and violence (if demands are not met) happens, it is likely we will soon see similar (or more likely, worse) invasions of privacy. Capital's end goal is to increase the number of guns, gates, and guards around as many borders as possible, internet included, eliminating any possibility of anonymity. Please keep that in mind.
Requirements & Considerations
Two purchases will be made during the course of this guide, totaling between 8-12 USD. The costs will be recurring on a monthly basis. The majority of the cost will be due to the VPS. Additionally, some DNS changes may take up to 30 minutes to propagate, plan accordingly. This guide will be broken into parts. Each part will denote it's service or working area.
VPS Host - Digital Ocean
What's a VPS?
A VPS is a Virtual Private Server (VPS). Basically a computer you're renting from a company. Most of the time it's a virtual machine, which means that you are renting a computer being imagined by an actual computer. Often times the computer imagining yours, is also imagining several other computers at the same time. For the record, that's referred to as Shared Hosting.While there are no shortage of options, this guide will be using Digital Ocean as the VPS provider. They refer to their VPS as "droplets". This guide will only use Digital Ocean's nomenclature to provide direction, opting to use "VPS" in all other instances.
Create Droplet
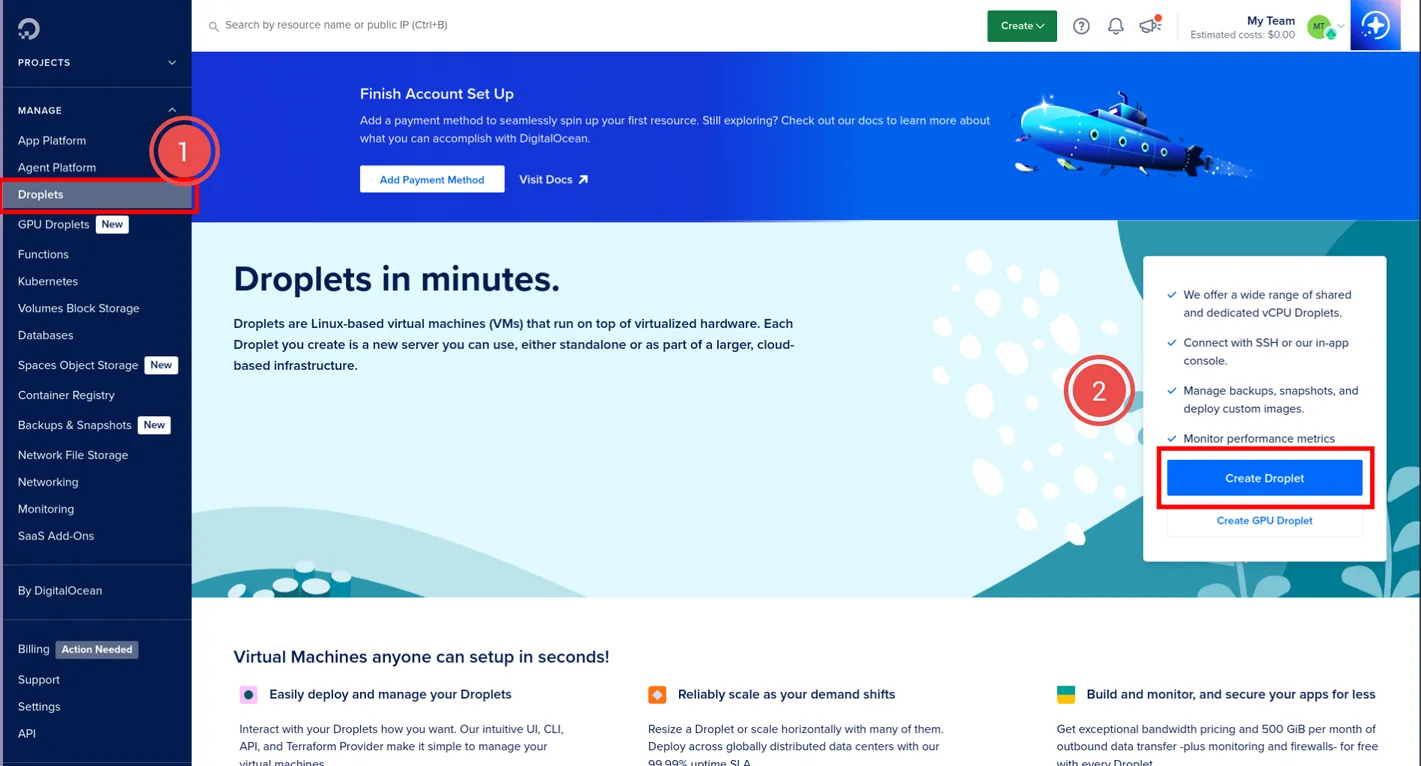
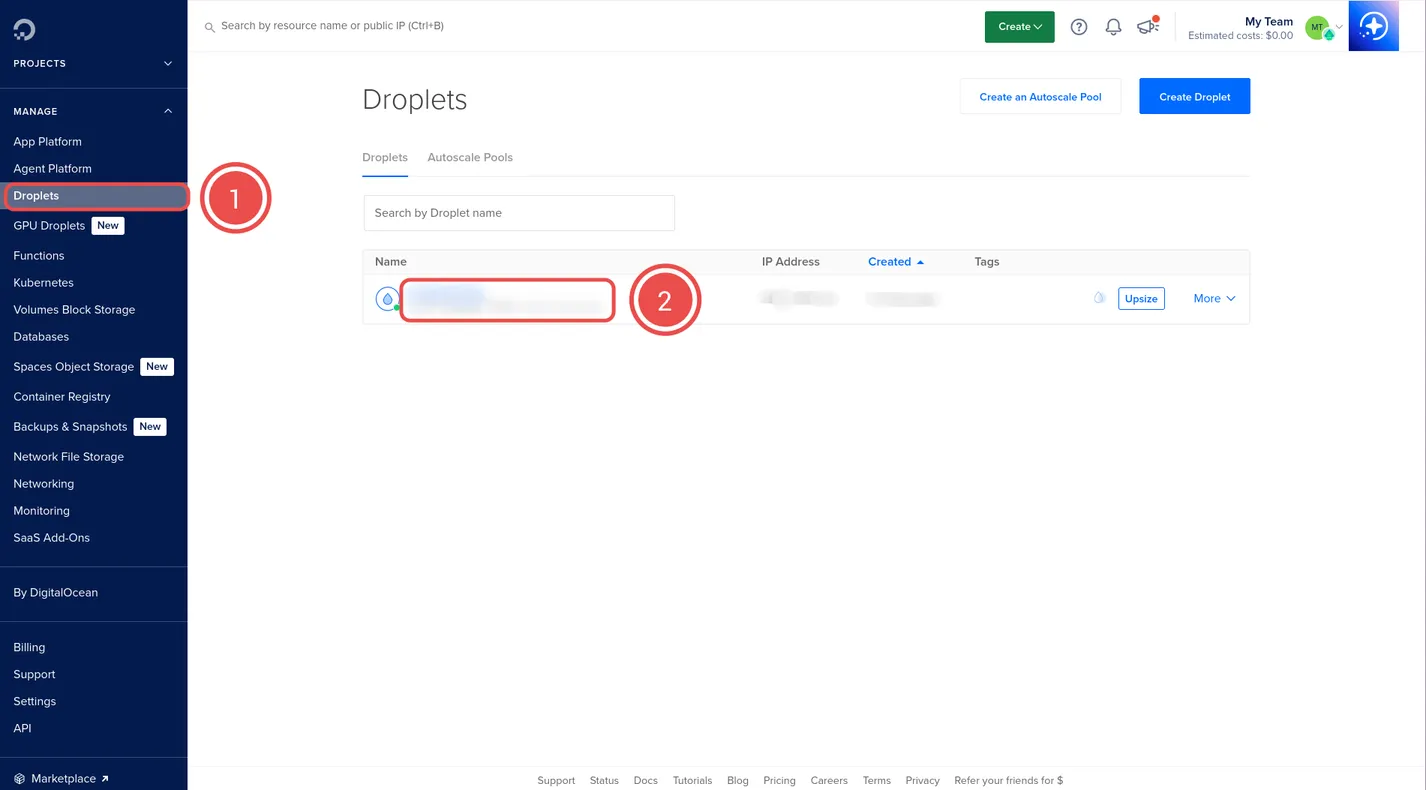
- After making an account, use the bar on the left to select Droplets.
- Click Create Droplet.
Choose Region
Choose the region that's closest to you, or the majority of the people who are going to be using the IRC server.
Datacenter
Again, pick the datacenter closest to you. If you can't figure out which datacenter is closest, just pick one for your region.
Choose an Image
If you know what you're doing, pick the image you're most comfortable with. If you want to follow along, this guide will be using the Ubuntu Version 25.04 x64 Image.
What's an Image?
An image is the Operating System (OS) your VPS will use. These are usually going to be Linux distributions (Often referred to as distros).Choose Size
These options determine how powerful the VPS is. This guide will be choosing nearly the cheapest options. However, if you plan on using this VPS for anything else you may want your VPS to be a bit beefier.
Droplet Type
- Shared CPU Basic
CPU Options
- Regular - Disk type: SSD
- $6USD/mo Option
- 1 GB / CPU
- 25 GB SSD Disk
- 1000 GB transfer
Digital Ocean offers additional storage and automated backup plans if you feel that's necessary. This guide will not use them.
Choose Authentication Method
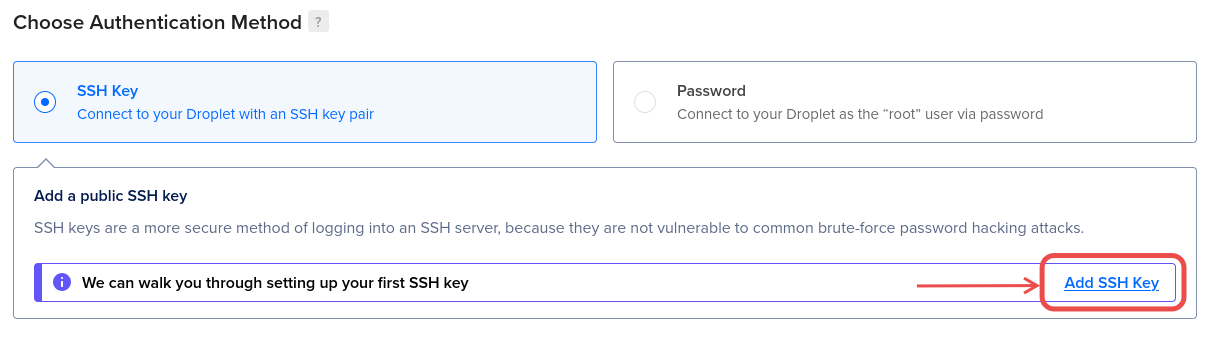
Pick the SSH Key option, instead of a password and click the "Add SSH Key" link. Leave the resulting popup open. This guide will use OpenSSH to generate a key pair, separated by Operating System (OS).
OpenSSH Key Pair Generation
Mac
Open your terminal and run the following command: ssh-keygen. Name the file and hit enter. Pick a password for it. That will create two files one with the .pub extension and one without. Use the terminal to display the contents of the .pub file with the command cat ~/.ssh/THE-NAME-YOU-CHOSE.pub. Copy the output into the SSH key content field on the Digital Ocean website.
Linux
Verify OpenSSH Installation
OpenSSH is default installed on Mac. Sometimes default installed on Linux. Windows users, we'll get to you. To check if OpenSSH is installed. Open your terminal and run the command ssh -V. If it's installed, it will list the current version of OpenSSH. If nothing happens, or you get something like "command not found" then it isn't installed.
Install OpenSSH
To install OpenSSH, use your distros package manager. Check your distro by opening a terminal and running cat /etc/os-release. This will print a bunch of junk. Look for a line that says something like: NAME, or ID, or PRETTY_NAME. e.g. on Fedora, you would get: NAME="Fedora Linux`. Then, refer to your distros documentation to determine which package manager to use. e.g. on Fedora, use the command sudo dnf install openssh
Generate SSH Key
Open your terminal and run the following command: ssh-keygen. Name the file and hit enter. Pick a password for it. That will create two files one with the .pub extension and one without. Use the terminal to display the contents of the .pub file with the command cat ~/THE-NAME-YOU-CHOSE.pub. Copy the output into the SSH key content field on the Digital Ocean website.
Windows
From the official website,Generate a Key with PuTTygen
- Open PuTTYgen.exe.
- Select the "Generate" option.
- Select RSA as the type of key to generate.
- Use 2048 bits as the size (strength) of the key.
- Don't fuck with the prime generation method, use the default settings.
- Press the "Generate" button.
- Add a comment so you know what the key is.
- Set a password.
- Press "Save private key" and choose where and what to save the file as.
- Once done the "Public key for pasting into OpenSSH authorized_keys file" should give you the string of text you need to enter into the SSH key field on Digital Ocean.
Final Details
Digital Ocean has a number of "Recommended Options" and "Advanced Options". Unless you specifically need those, just skip them.
- Quantity: This guide will only use one.
- Hostname: Name the VPS.
- Tags: If you have multiple VPS you can add a tag to distinguish it.
- Project: The default project is fine.
Finalize
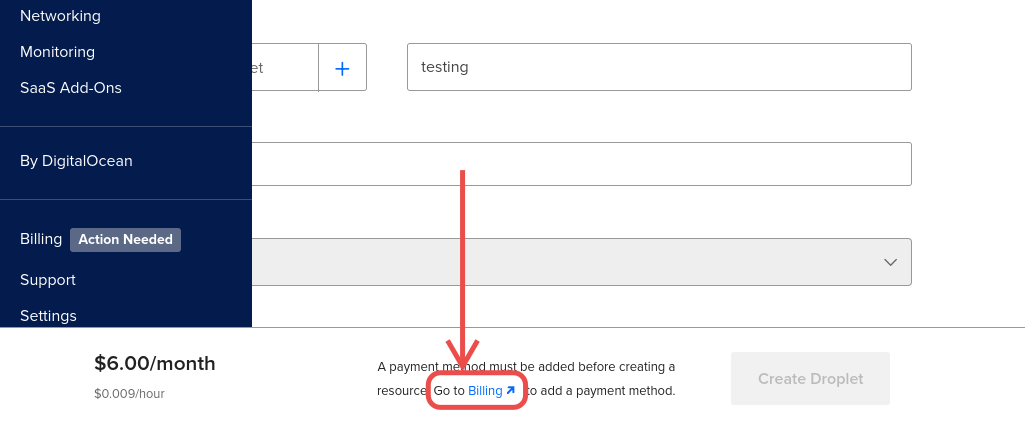
You have to add a payment method before you can finish creating your VPS. A "Billing" popup should appear. Open it in a new tab and fill it out. You can return to this tab when done and finalize.
Set a Static IP
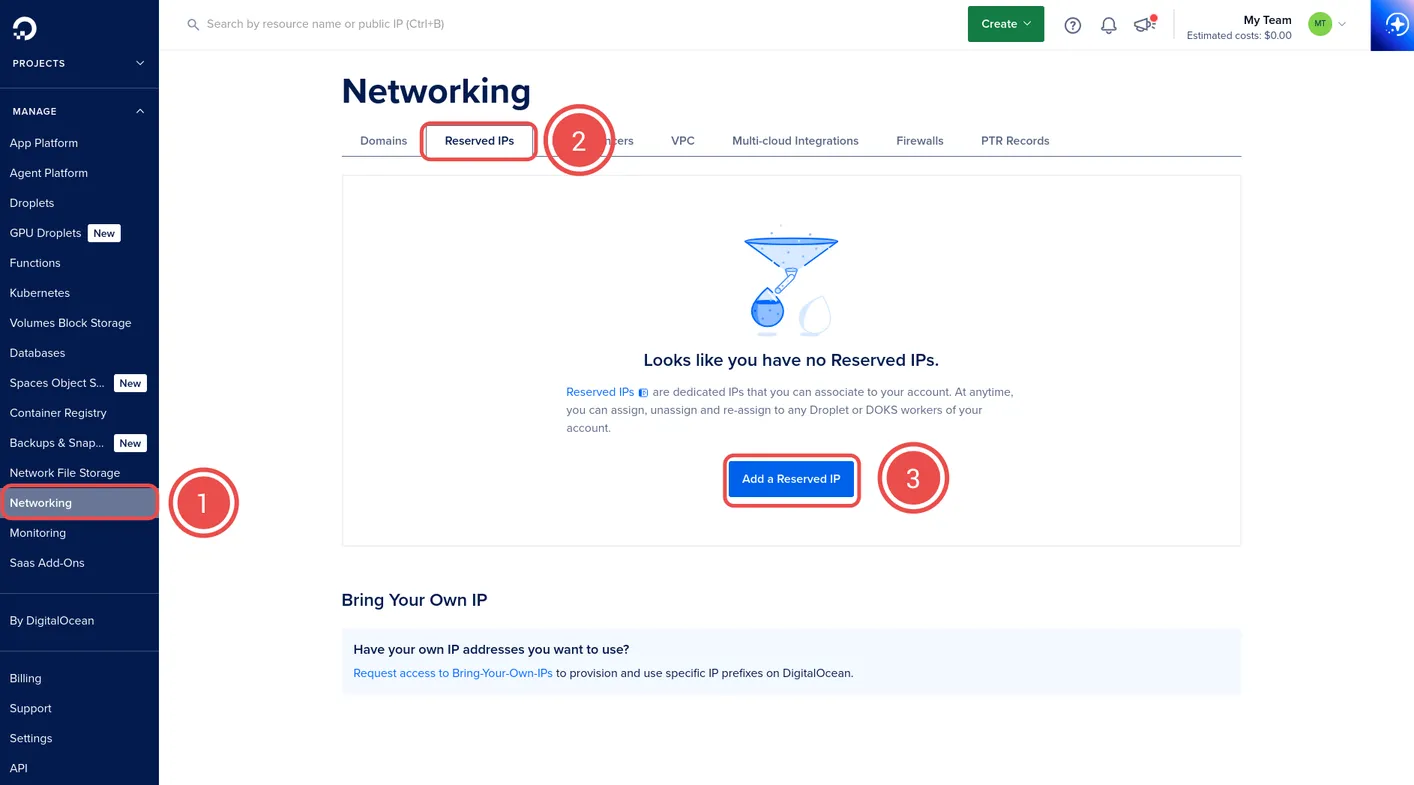
- Once the VPS has been created, use the panel on the left to view "Networking" options.
- Select the "Reserved IPs" tab.
- Click "Add a Reserved IP".
Add a Reserved IP
- What type of IP do you want to reserve: IPv4 Address
- Where would you like to add the IP: Assign to Droplet
- Select a Droplet: Choose the VPS you created in the previous step.
- Click "Add a reserved IP to this Droplet" to finalize.
Once done, the page will return to the "Reserved IPs" tab of the "Networking" page and the static IP will be listed under the "IPv4 Address" column, with the associated VPS listed under the "Assigned To" column.
Domain Registrar - Namecheap
Again, there are an absurd number of domain name providers on the market. They all have their pros and cons. This guide will be using Namecheap to purchase a domain and redirect it to an IRC server.
Buy a Domain
After making an account on namecheap, use the search bar in the center to check the availability of the domain name you want to use for the IRC server. The domain name doesn't need to be pretty. It may be tempting to get a funny or cute TLD (That's the .com or .org or .net after the name of the site), but don't spend extra on it.
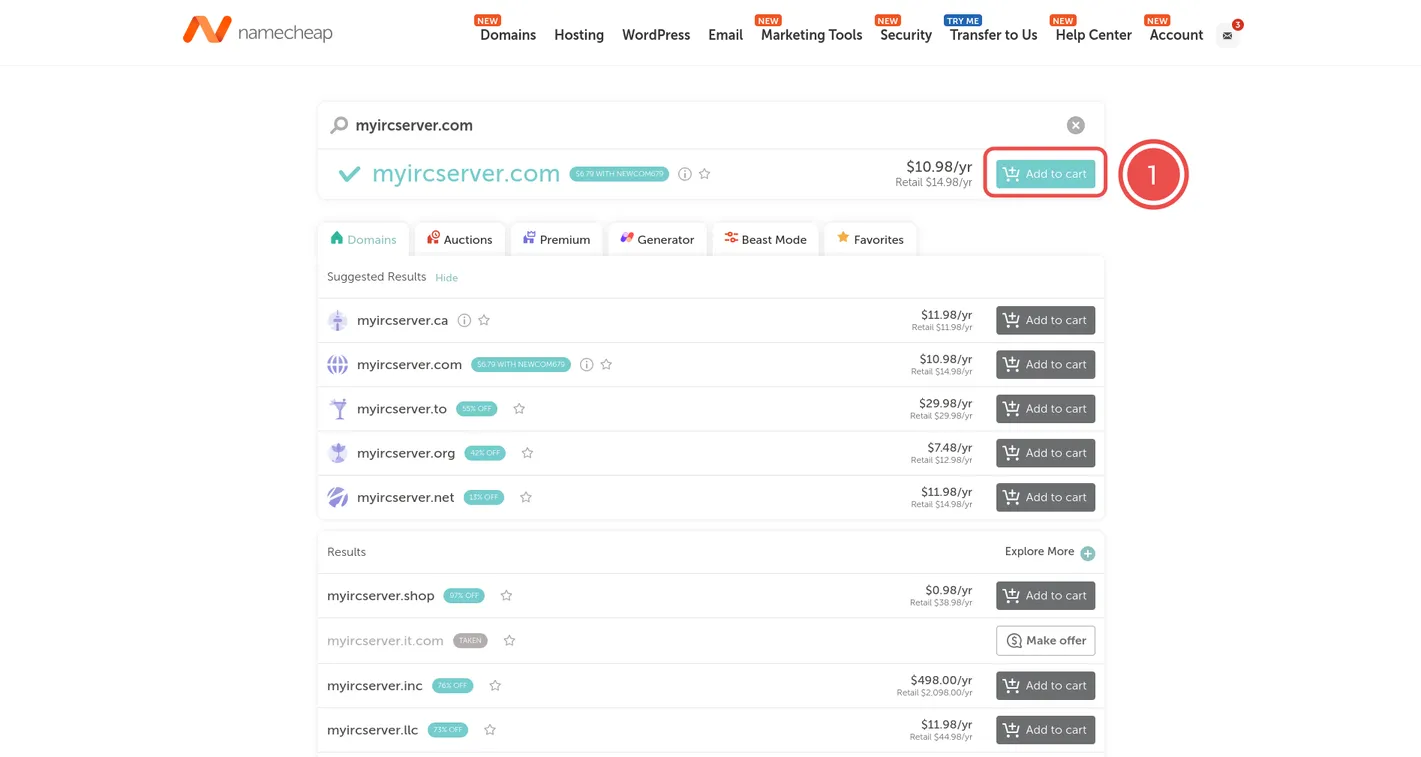
- Click "Domains" to display the domain search bar.
- Enter the name you would like, e.g. "myircserver.com".
- Hit Search.

If the name you want is available, it will display at the top of the page with a green check mark next to it. If not, namecheap will offer alternative names.
- Click "Add to cart".
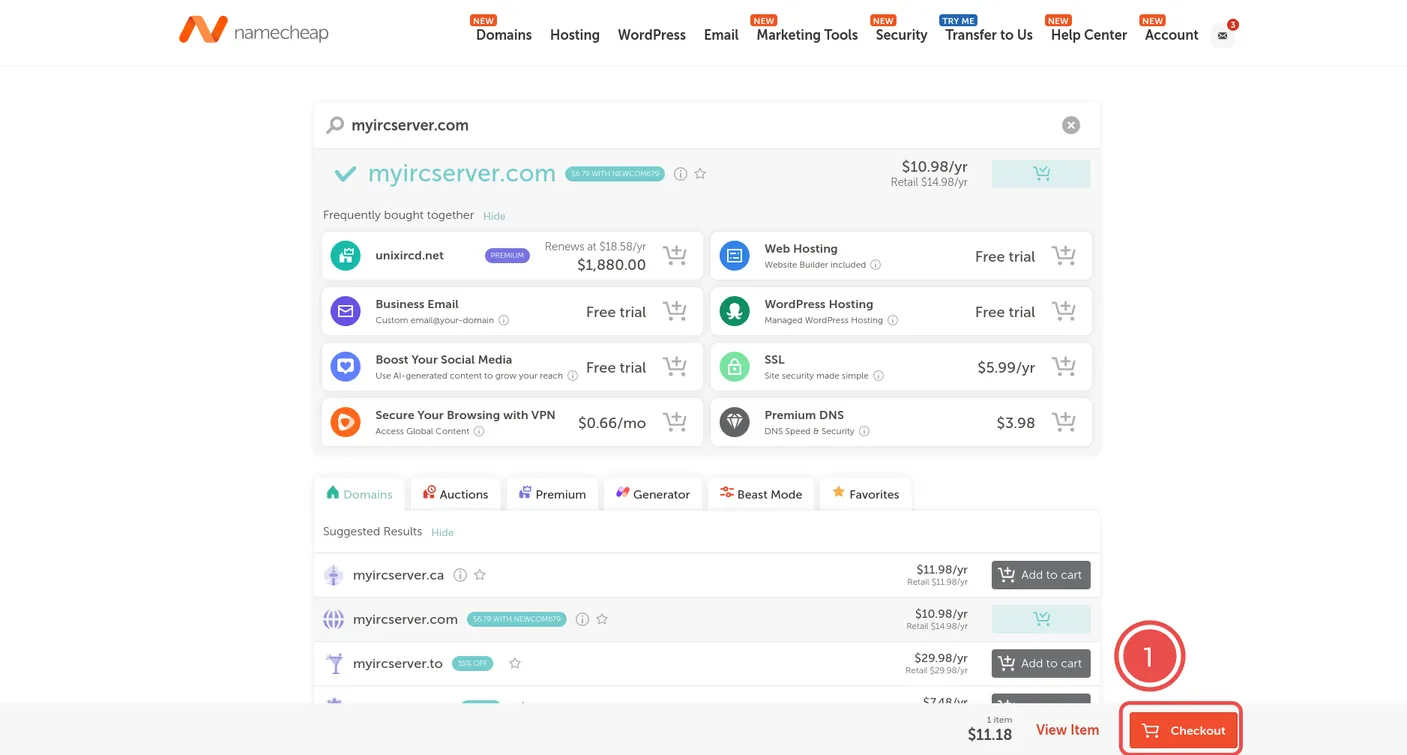
Once the item is added to your cart, namecheap will offer a number of "recommended" products. Don't worry about those.
- Proceed to checkout by clicking the "Checkout" button at the bottom of the screen.
On the checkout screen, make sure to check the following areas before proceeding.
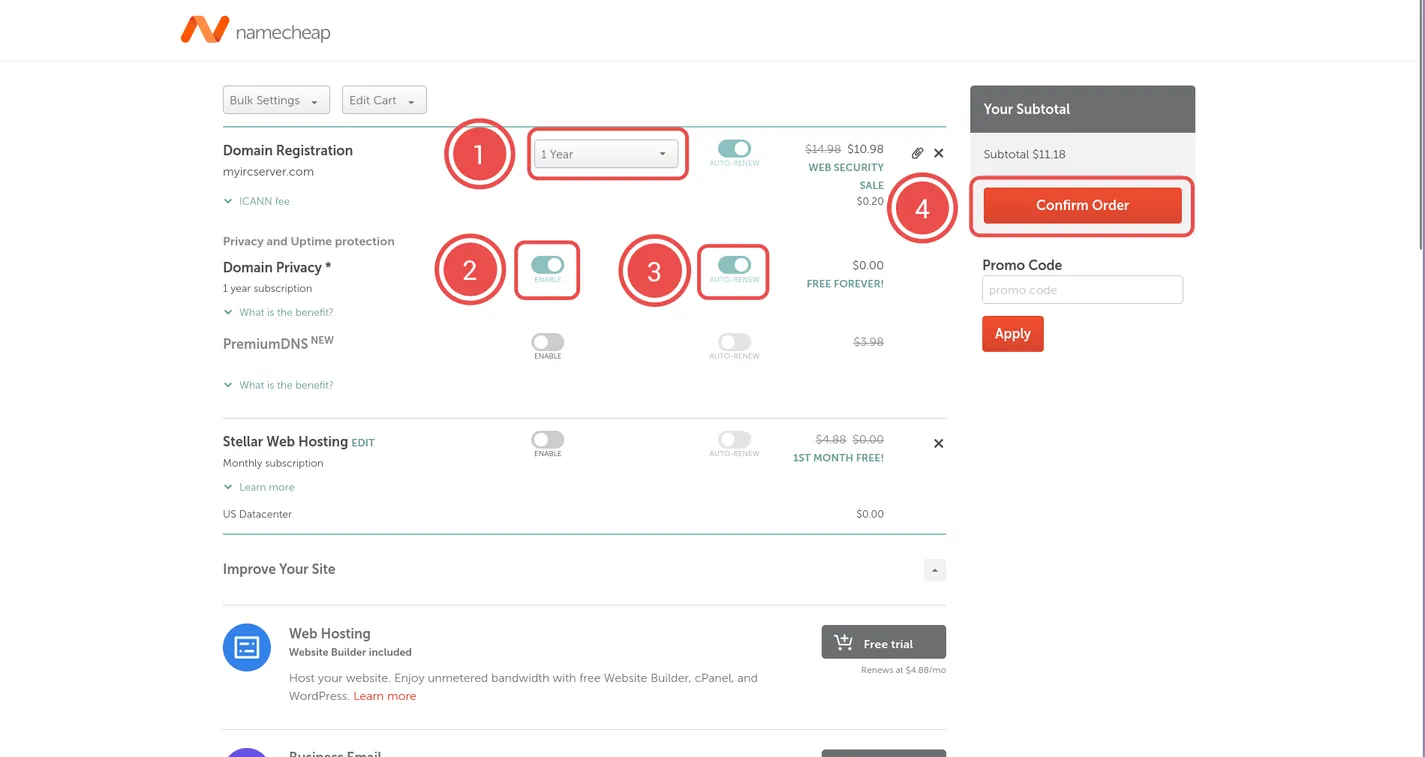
- Domain Registration: The duration of time you are registering the domain for. It should default to 1 year, but you can adjust as needed. To the right of that, you can also set whether or not you want the domain to auto-renew.
- Domain Privacy: When registering a domain, your personal data is associated with it. Meaning it can be looked up on the public Whois database. This unfortunately is, and has been, the case for some time now. The "Domain Privacy" option helps to mitigate that risk by redacting some of your personal data. Make sure this option is on.
- Domain Privacy Auto-Renew: Domain Privacy is offered for free by namecheap, so ensure that it auto-renews.
- Once everything is in order, click checkout to finish paying and register your domain.
Create Name Servers - Digital Ocean
- Log back in to Digital Ocean. Use the bar on the left to open the "Networking" page.
- Click "Add a domain".
- Enter the name of the domain you purchased in the format of
DOMAIN.TLD. - Click "Add domain". Once done, the Networking page will be displayed. Name servers for the domain will be present under the "Value" column.
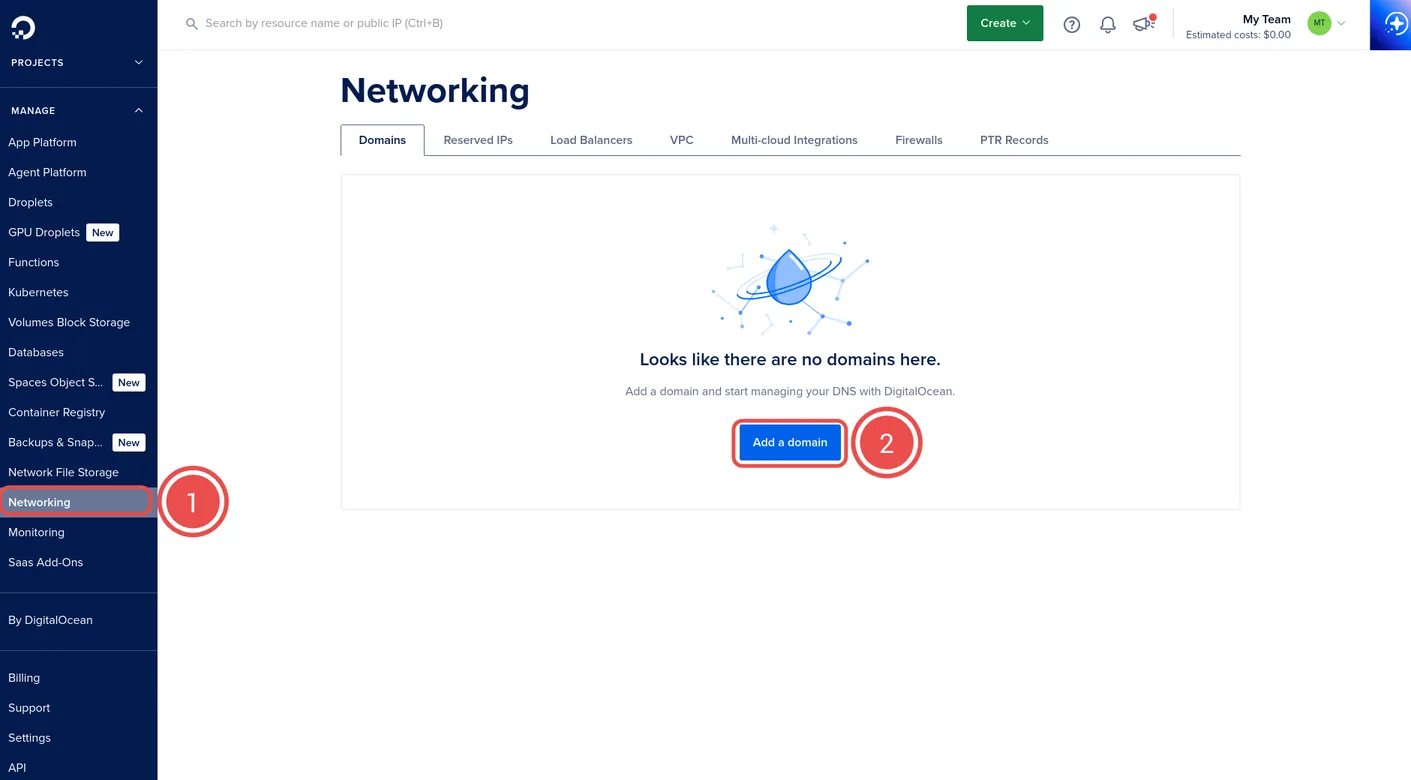

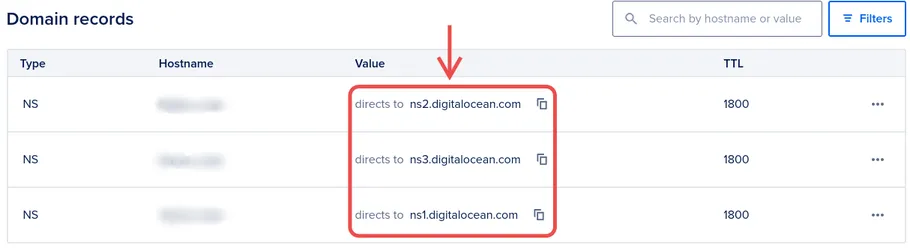
Copy these name servers down as they will be entered into the namecheap DNS records to properly direct traffic to the VPS.
Point Domain to VPS - Namecheap
- Log back in to namecheap. Hover over the profile dropdown on the top left of the page.
- Click Dashboard.
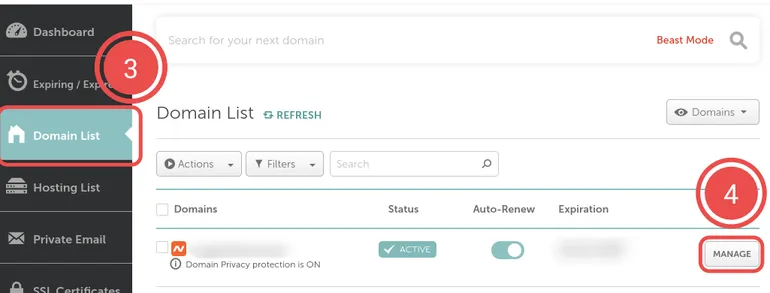
- Using the menu on the left, click "Domain List".
- Click "Manage" on the domain that was registered earlier.
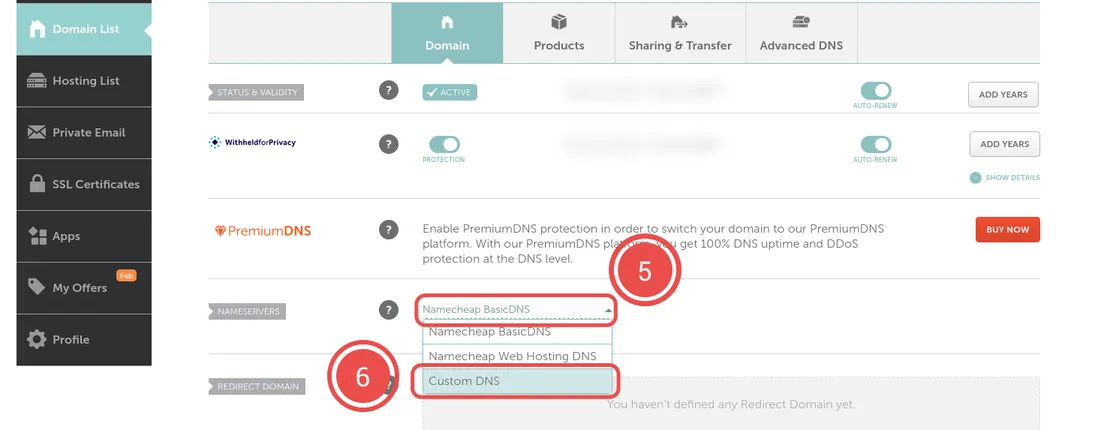
- On the following "Domain" page, hover over the "Namecheap BasicDNS" option to the right of "Nameservers".
- In the dropdown, click "Custom DNS". Two input fields will appear as well as an "ADD NAMESERVER" button beneath them.
- Click "ADD NAMESERVER" until there is a total of 3 input fields.
- Enter the name servers provided by Digital Ocean. The order doesn't matter. Click the checkmark to the right of the "Custom DNS" box to confirm the entry.

Point VPS to Domain - Digital Ocean
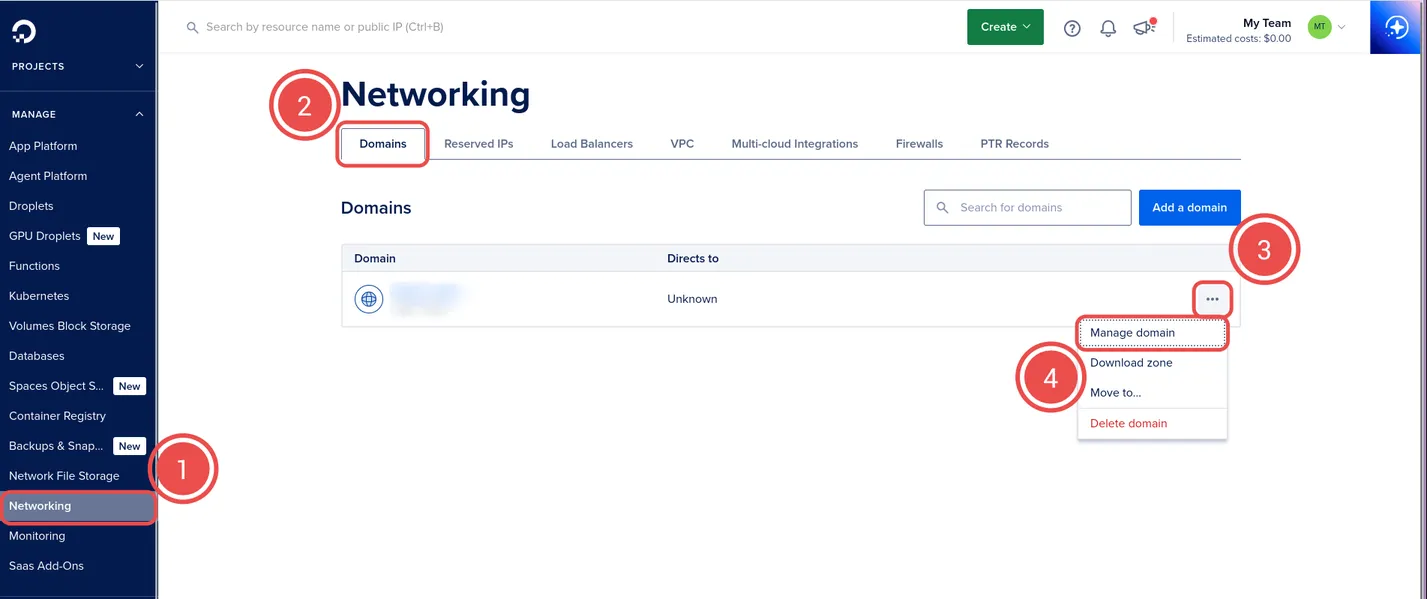
- Back on Digital Ocean, login and use the menu on the left to navigate to the "Networking" page.
- Click the "Domains" tab.
- Click the hamburger icon.
- Click "Manage domain".
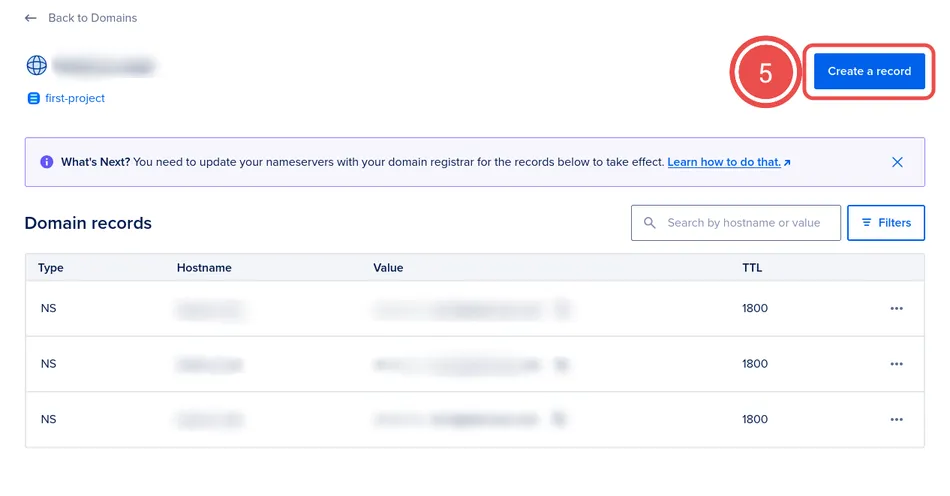
- On the following page, click "Create a record".

On the resulting popup, enter the following information.
- Record Type: A
- Hostname: Enter
@ - Will direct to: Select the static IP that was established for your VPS. If you have been following the guide, this should be the only option aside from the VPS itself.
- TTL (seconds): The default 3600 is fine.
Finalize with the "Create Record" button at the bottom right. Then, repeat from step 5 but replace @ with www.
Connect to the VPS - Digital Ocean
- Log back in to Digital Ocean. Click "Droplets" in the bar on the left to view your VPS.
- The name of the VPS will be displayed within the 2nd highlighted section. Click the name to view more options for that VPS.
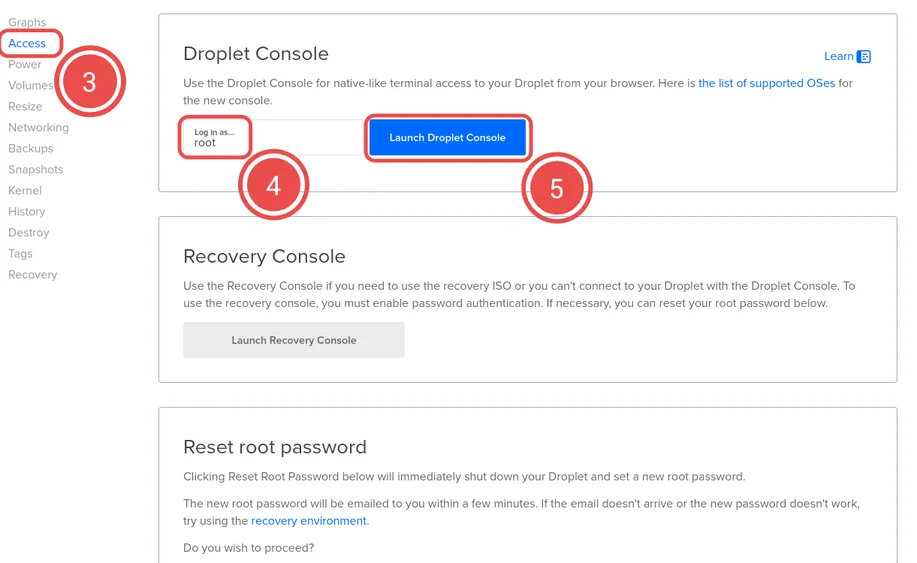
- Click the "Access" option on the sub-menu for the VPS.
- Ensure you are logging in as root.
- Click "Launch Droplet Console" to open a new tab which will display the terminal for your VPS.
WAIT! BEFORE YOU DO ANYTHING! UPDATE
Assuming you've been following along, you will need to update your OS. Run apt-get upgrade after all that installs run apt upgrade. Then reboot. Then do-release-upgrade. It should prompt for reboot. Accept.
Prepare MySQL for Persistent History
Typically, IRC servers are ephemeral. Meaning chat history won't be there if you log off, or weren't present for a conversation. Ergo offers MySQL integration in order to provide persistent history. To enable it, connect to your VPS console using the steps above and follow these steps:
- Install MySQL with
sudo apt install mysql-server - Run
sudo mysql_secure_installationto update security settings for the install. - Enter
yto create a password for your MySQL server. - Enter
2to use the STRONG password validation policy. This doesn't particularly matter in the end as authentication will be done automatically. - Enter
yto remove anonymous users. - Enter
yto disallow root login remotely. - Enter
yto remove the default "test" database anyone can access. - Enter
yto reload privilege tables.
Once all of the above is done, connect to the MySQL server to begin configuring it for Ergo:
- Enter
mysql --user rootto connect. -
Create a new MySQL user. The purpose of this user is to manage the database. Enter
CREATE USER 'ergo'@'localhost' IDENTIFIED BY 'SETYOUROWNPASSWORD';.- Change
SETYOUROWNPASSWORDto something of your own choice. Do not lose that password.
- Change
- Create a database to store Ergo chat history. Enter
CREATE DATABASE ergo_history; - Give the user that was created all priveleges over the new database. Enter
GRANT ALL PRIVILEGES ON ergo_history.* to 'ergo'@'localhost'; - Exit MySQL by entering
exit.
Generate TLS Certificates
This guide will use Certbot to get valid Transport Layer Security (TLS) certificates from Let's Encrypt. These are necessary to ensure that your IRC server is secure.
- Ensure you are in your home directory by entering
cd ~. - Enter
sudo snap install core; sudo snap refresh core. - Enter
sudo snap install --classic certbot. - Enter
sudo ln -s /snap/bin/certbot /usr/bin/certbot. - Enable OpenSSH connections using Uncomplicated Firewall (UFW). Enter
sudo ufw allow OpenSSH. - Update the firewall to allow Certbot through. Enter
sudo ufw allow 80andsudo ufw allow 443. - Update the firewall to allow the specific port Ergo will listen on:
sudo ufw allow 6697/tcp - Enter
sudo systemctl enable ufw.serviceto ensure UFW starts on system boot. - Start UFW with
sudo ufw enable. Enteryto confirm activation. -
After installation, enter
sudo certbot certonly --manual --preferred-challenges dns -d DOMAIN.TLD.- Replace
DOMAIN.TLDwith the domain you registered on namecheap.
- Replace
- On first run, Certbot asks you to enter the email address you want associated with this certificate.
- Enter
yto agree to the terms of service. - Enter
nto opt out of emails from Let's Encrypt.
Once the Certbot has requested the certificate, it will ask you to deploy a DNS TXT record. This can be done the same way you pointed your VPS to your domain. Therefore:
- Back on Digital Ocean, login and use the menu on the left to navigate to the "Networking" page.
- Click the "Domains" tab.
- Click the hamburger icon.
- Click "Manage domain".
- On the following page, click "Create a record".
- Record Type: TXT
- Hostname: Enter
_acme-challenge - TXT Value: This is provided by Certbot in the terminal as a string of letters and numbers.
- TTL (seconds): The default 3600 is fine.
Finalize with the "Create Record" button at the bottom right. Once the record is created, wait a couple minutes for the DNS to propagate the change. Then back in the console, press enter. Certbot will list the directories of the Certificate and the Key, as well as when the certificate expires.
Download & Set Up Ergo
Reconnect to the VPS as before and follow these steps:
WAIT! Do You Know What Vim Is?
This guide will use Vim to edit the configuration files for the Ergo server. If you've never used vim before, you're going to be lost. Here are the basics you need to know for now.Editing
In order to add text to a file, press
i to enter INSERT mode. Press Esc to exit. Commands beginning with : can not be used while in INSERT mode.
Saving and Quitting
This is done via commands. Save: type
:w and press enter. Quit: type :q and press enter. Save and Quit: type :wq and press enter.
Searching
This is done with a command. To start a search type
/ then type what you want to search for. Hit enter to close the search prompt.
- Ensure you are in your home directory by entering
cd ~./li - Download the Ubuntu version of Ergo with the command
wget "https://github.com/ergochat/ergo/releases/download/v2.11.0/ergo-2.11.0-linux-x86_64.tar.gz". - Unpack the file using the command
tar -xvf ergo-2.11.0-linux-x86_64.tar.gz. - Change directories into the unpacked file with
cd ergo-2.11.0-linux-x86_64. - Copy and rename the default yaml file with
cp default.yaml ircd.yaml. - Create a dedicated, unprivileged role user who will own the ergo process and all associated files by entering:
adduser --system --group --home=/home/ergo ergo. This user now has a home directory at/home/ergo. - To prevent other users from viewing Ergo's configuration file, database, and certificates, restrict the permissions on the home directory by entering:
chmod 0700 /home/ergo. - Copy the executable, the config file, and the motd file to
/home/ergoby enteringcp ergo ircd.yaml /home/ergo. - Copy the
languagesdirectory to/home/ergoby entreingcp -r languages /home/ergo. - Change working directory to the new folder by entering
cd /home/ergo. - Create an admin password by entering
./ergo genpasswd. This will prompt you to enter a password, and then enter it again. Once done it will provide a string of letters and numbers. This is a hashed version of the password you just created. Copy the hashed password and save it somewhere you won't lose it. - Open ircd.yaml for editing with the command
vim ircd.yaml. The file has a plethora of options, and has a lot of developer commentary on what things do. Read through the file to add to your understanding of what makes the server work. - Search
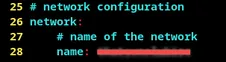
name of the network. Add the name of your site in the format ofnameofmysite. No spaces, no special characters. Example:name: nameofmysite. - Search
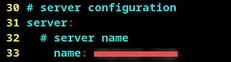
server configuration. Add the domain of the irc server in the format ofDOMAIN.TLD, replacing DOMAIN with the name of your site and TLD with whatever comes after the dot. Example:name: mysite.com. - Search
SNI. Update thecert:andkey:lines to look example like the following screenshot: - Search
/OPER dan. Add the hashed password you created earlier in between the quotes afterpassword:. -
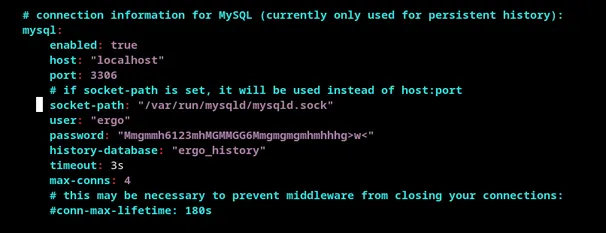
Search
connection information. Update the the following lines as instructed:- enabled:
true - host:
"localhost" - port:
3306 - socket-path:
/var/run/mysqld/mysqld.sock - user:
"ergo" - password: Set this to the MySQL password you created when preparing the MySQL database.
- history-database:
"ergo_history"
- enabled:
- Search
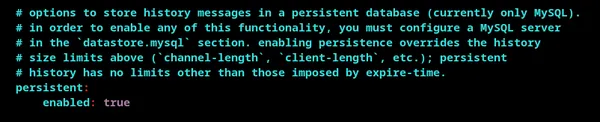
expire-time:. Add a#right before theeof expire. The line should look as follows: - Search
datastore.mysql. Update theenabled:option below totrue. This line should look as follows: - Search
registered-channels:. Update the filed totrue. It should look as follows: - Search
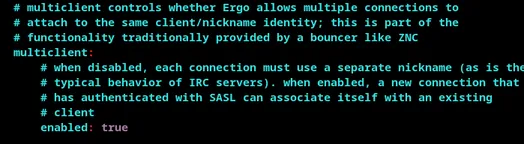
multiclient:updateenabled:on the following line totrue. It should look as follows: - Search
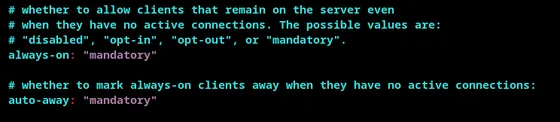
no active connections.. On the following lines, updatealways-on:tomandatory. andauto-awaytomandatoryIt should look as follow: - Save and exit the file.
- Copy the certificate and key created by Certbot to
/home/ergo. To do this, first entercd /etc/letsencrypt/live/to move to the directory created by Certbot. Then typelsto see what's in that folder. There should be a README and one other file. That other file is the directory you want to enter. Typecd, the name of that directory, and then press enter. - Enter
cp fullchain.pem privkey.pem /home/ergo. - Ensure that all copied files are owned by the Ergo user created earlier, by entering:
sudo chown -R ergo:ergo /home/ergo. - Enter
cd /etc/systemd/system. - Enter
curl -O https://raw.githubusercontent.com/ergochat/ergo/refs/heads/stable/distrib/systemd/ergo.serviceto download Ergo's example system service file. - Edit the file with vim to enable persistent history:
vim ergo.service. The file has instructions to follow inside of it. - Enable the Ergo service with
systemctl enable ergo.service - Reload services with
systemctl daemon-reload. - Start the Ergo service with
systemctl start ergo.service


If everything went right, there won't be any output to the terminal. Check if the service is running with systemctl status ergo.service. The terminal will show something along the lines of active if the service is running.
Finalize TLS Configuration
Certs are created, and Ergo is pointed to their location. However the Ergo user may not have permissions over them yet. To fix this:
- Change working directory with
cd /etc/letsencrypt/renewal-hooks/deploy/. - Create, edit, and name and empty file with
vim install-ergo-certificates. - Paste the following into the file using
CTRL+SHIFT+v - On line 6 and 7, replace
example.comwith your domain and tld. - Save and exit the file
- Make the file executable by entering
chmod +x install-ergo-certificates - Run the file with
sudo ./install-ergo-certificates
#!/bin/bash

set -eu

umask 077
cp /etc/letsencrypt/live/example.com/fullchain.pem /home/ergo/
cp /etc/letsencrypt/live/example.com/privkey.pem /home/ergo/
chown ergo:ergo /home/ergo/*.pem
# rehash ergo, which will reload the certificates:
systemctl reload ergo.service
Connect to Ergo with an IRC Client
There are any number of IRC clients to use, but this guide will be using Halloy to connect to the Ergo server.
Halloy
Click the link for your operating system to be taken to the associated instructions.
Mac Linux WindowsMac
Halloy can be installed via Homebrew, which has a dependency on xcode-select.
xcode-select
- Check if xcode-select is installed navigating to the terminal. Press
CMD+Space, typeTerminaland press enter. - Enter
xcode-select -pIf it returns a file path, xcode is installed. If there's an error message, or nothing happens xcode-select will need to be installed.- If xcode-select is not installed, type the following into the terminal and press enter:
xcode-select --install
- If xcode-select is not installed, type the following into the terminal and press enter:
Homebrew
- Check if Homebrew is installed. Open the terminal by pressing
CMD+Space, typingTerminaland pressing enter. - Enter:
brew --versionIf the terminal returns a version number, it's installed.- If an error presents or nothing happens, Homebrew will need to be installed by entering the command
/bin/bash -c "$(curl -fsSL https://raw.githubusercontent.com/Homebrew/install/HEAD/install.sh)"
- If an error presents or nothing happens, Homebrew will need to be installed by entering the command
Install Halloy
Once both xcode-select and Homebrew are confirmed to be installed, enter the following into the terminal and press enter: brew install --cask halloy
Linux
Fedora
If you are using Fedora you can install Halloy using the Fyra labs terra repository, which is a list of programs and utilities meant to supplement Fedora's native list of packages. In addition to the Fyra labs repository, Halloy has a dependency on Rustup which will be detailed in the section after Fyra.
Fyra labs terra Repository
- Check if the Fyra labs "terra" repo is enabled. Open a terminal and enter:
sudo dnf repolist. If the "terra" repo is listed, skip to Install Halloy section.- If "terra" is not listed, add it by entering the following command into the terminal:
sudo dnf install --nogpgcheck --repofrompath 'terra,https://repos.fyralabs.com/terra$releasever' terra-release
- If "terra" is not listed, add it by entering the following command into the terminal:
Rustup
- Check if Rustup is installed by entering the following command into the terminal:
rustup --version. If it returns a version number, it's installed.- If nothing happens, or an error is presented rustup will need to be installed with the following command:
curl --proto '=https' --tlsv1.2 -sSf https://sh.rustup.rs | sh
- If nothing happens, or an error is presented rustup will need to be installed with the following command:
Install Halloy
Ensure background dependencies are installed by entering the following command into the terminal: sudo dnf installalsa-lib-devel openssl-devel libxcb-devel
Once the Fyra labs "terra" repository and all dependencies are in place, Halloy can be installed by entering the following command into the terminal: sudo dnf install halloy.
Debian/Ubuntu
Halloy can be installed via an install script included in the git repository. Before it can be installed, ensure dependencies are in place.
Git
- Check if Git is installed by entering the following command into the terminal:
git --version. If it returns a version number, it's installed.- If nothing happens, or an error is presented rustup will need to be installed with the following command:
sudo apt install git
- If nothing happens, or an error is presented rustup will need to be installed with the following command:
Install Halloy
Ensure background dependencies are installed by entering the following command into the terminal: sudo apt install librust-alsa-sys-dev libssl-dev libxcb1-dev. Then:
- Change to the home directory by entering the following command into the terminal:
cd ~ - Clone the git Halloy git repository with the command
git clone https://github.com/squidowl/halloy.git - Change directories into the newly created "halloy" folder with the command
cd halloy - Launch the install script by entering the command
./scripts/install-linux.sh --prefix=<base/directory>
Windows
Halloy can be installed using winget.
Winget
- To check if winget is installed, open a terminal by pressing the
Winkey, typingTerminaland pressing enter. Once the terminal is open typewingetIf it is installed, a help message will be displayed.- If an error message is displayed, it will need to be installed using the Microsoft Store.
Install Halloy
Once winget is installed, open a terminal by pressing the Win key, typing Terminal and pressing enter. Then enter the following command: winget install squidowl.halloy
Configure Halloy
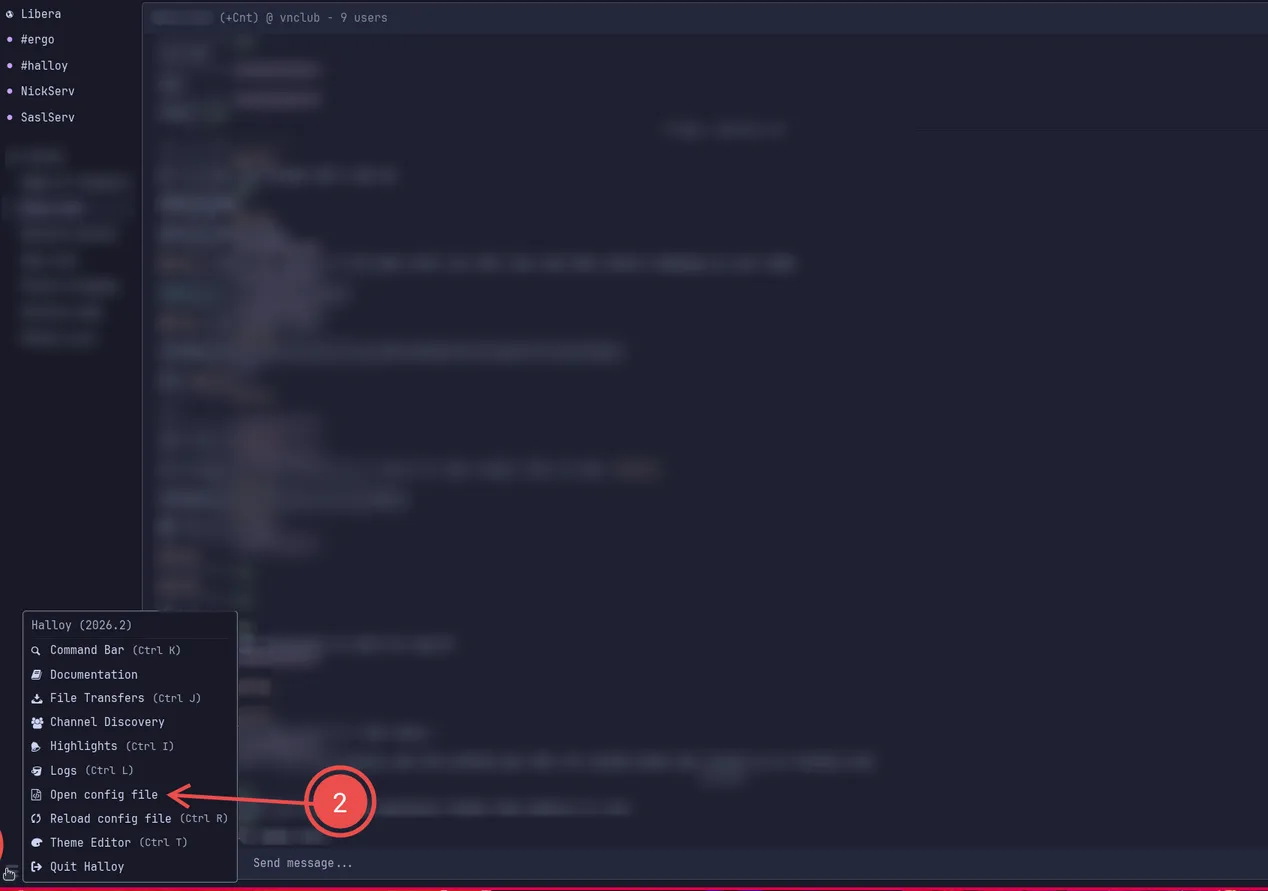
Halloy can be configured through the config.toml file. Which can be opened using the hamburger menu in the application.
- Click the hamburger icon in the bottom left.
- Click "Open config file". This should open the config file in your system editor.
- Add the following code to the bottom of your config.toml file.
- Save the changes, close the config.toml file, and restart Halloy.
[servers.DOMAIN] # Edit 1: Replace DOMAIN with the domain
server = "DOMAIN.TLD" # Edit 2: Replace DOMAIN.TLD with the domain and the tld
use_tls = true
port = 6697
nickname = "" # Edit 3: Put the username you want between the quotes
#SASL login
#[servers.DOMAIN.sasl.plain]
#username = "" # Edit 4: Put your username between the quotes
#password = "" # Edit 5: You will generate a password later. Put it between the quotes here.
Once done, Halloy should connect to the ergo server created in the previous steps. There won't be any channels at first. Those will be created later. Next, this guide will address user creation and security.
Register Your Account - Halloy
At present, anybody can connect to the halloy server and register for an account. This guide will show you how to turn that off, in order to create a "private" server. With Halloy open, follow these steps:
- In the message bar, type:
/NS REGISTER passwordReplacepasswordwith something strong of your choice. If successful the NickServ should message you saying You're now logged in as the nickname you registered. - Open the halloy config.toml file as before, and follow the instructions in the config.toml for
Edit 5. Delete the#at the start of the line, and at the start of the line above. Save, close the file, and restart Halloy.
You should now be connected to your server as a registered user, and can activate admin priveleges by typing /OPER admin password. Replacing password with the un-hashed version of the password that was created earlier using ./ergo genpasswd. Activating admin priveleges will be referred to as "OPER mode" from here forward.
Ergo/IRC Commands - IRC Client
Most administration of the Ergo server can be done via your IRC client (in this case, Halloy). For a larger list of commands, refer to the Ergo docs here. The commands listed below are channel agnostic, meaning it doesn't matter where you type these in so long as you enter them into a messagebox for the ergo server.
/join #channelname
Replace channelname with the name of the channel you want to join. The leading # must be included, and the name can not have spaces. If your are in OPER mode, this can be used to create a channel, if the channel you are trying to join does not exist.
/msg ChanServ register #channelname
Replace channelname with the name of the channel you want to register. This command grants whoever ran the command ownership of the channel, which allows for various moderation actions. This command can only be used by those with channel creation privileges, such as when in OPER mode.
/NickServ SAREGISTER username password
This will create an account named username with the password password. Replace those two fields as you see fit. This can only be done by those with account creation privileges in OPER mode. Accounts created this way can then change their password after logging in using the following command.
/NickServ PASSWD currentpassword newpassword newpasswordagain
Replace currentpassword with the password of the account running this command. Replace newpassword and newpasswordagain with the desired password. Once done, update the config.toml file for Halloy.
/REHASH
This command reloads the ircd.yaml file for the Ergo server, allowing for most configuration changes to be made without taking the server down.This command can only be used in OPER mode.
Restricting Account Creation - Digital Ocean/IRC Client
In order to make the server "private", account creation must be disallowed for everyone but those in OPER mode. This means that before someone can join, the server admin must make an account for them.
- Log in to Digital Ocean, and reconnect to the VPS as before.
- Change directory by entering:
cd /home/ergo - Open the configuration file by entering:
vim ircd.yaml - Search for
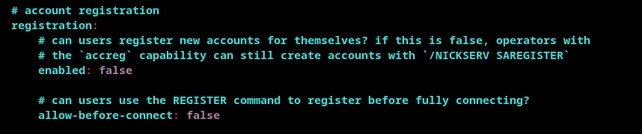
SAREGISTER. On the following line changeenabled:tofalse. Changeallow-before-connect:tofalse. It should look as follows: - Search for
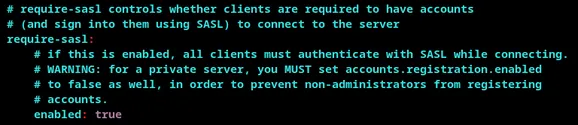
private server. On the following line setenabled:totrue. It should look as follows: - Save and exit the document.
- Back in your IRC Client (Halloy), enter the following command to reload the Ergo server configuration:
/REHASH.
The End
That's the end. You made it, hopefully. Congratulations. Now you can create the channels you want in your server, and invite people. Good luck out there. Please form communities. Please Organize. Please take care of each other. Please understand that kindness alone can't save us.
Bonus
Provided below is a block of code you can put in Halloy's config.toml file to make it behave and look a bit more like a modern chat client. Each set of changes is preceded by a comment which in part explains what each section does.
#shows channel topic
[buffer.channel.topic]
enabled = true
#allows you to format text without needing to use /format
[buffer.text_input]
auto_format = "all"
#makes it so halloy doesn't open a new pane every time you click a channel or dm
[actions.buffer]
click_channel_name = "replace-pane"
click_highlight = "replace-pane"
local = "replace-pane"
message_channel = "replace-pane"
message_user = "replace-pane"
[actions.sidebar]
buffer = "replace-pane"
#changes position of name to be above messages
[buffer.nickname]
alignment = "top"
#highlights your name when someone says it, regardless of case
[highlights.nickname]
include = ["*"]
case_insensitive = true
#condenses all the join and left messages
[buffer.server_messages.condense]
messages = ["join", "part", "quit"]
dimmed = true
# gives you notification like behavior when someone mentions your name
[notifications.highlight]
sound = "bloop"
show_toast = true
show_content = true
[notifications]
direct_message = {sound = "bloop", show_toast = true, show_content = true, exclude = { users = ["Nickserv", "SaslServ", "ChanServ"]}}